Friday, February 11, 2011
Bridge Over the Penobscot River
The bridge alignment wasn't perfect and came a little too close to the wall. I took it back down again to trim a little more off the front of the river bottom. This will give me a better track alignment from the helix and a better alignment near the wall corner. I made the adjustments and put it back in place. I decided to lower it one more inch to reduce the grade. The grade looks better, but I still have a little problem with the connection to the helix. The sub roadbed just doesn't line up like I want. It looks like I'll need to go back about 2 feet and modify the approach to get a better angle. That can wait for another day.
Thursday, February 10, 2011
Searsport and Acadia
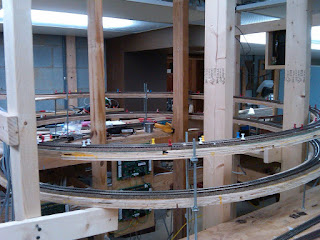
The helix has been completed and now has track all the way to the top. The helix has also been connected to the upper level with the sub roadbed. The roadbed has been completed up to the start of Acadia. This the the first location on the upper level just after exiting the helix.
You can see the sub roadbed at Acadia. Acadia is meant to be only a passing siding. The place that is shown might eventually be a double track bridge over the river. The bridge system that I already have from the old layout is unfortunately too tall. I would have three options:
1. One more turn to the helix which would allow a smaller grade in the helix and raise the track up so it could work.
2. Lower the section of bench work so the bridge will work. This will narrow the divide between the upper and lower level. The separation here is not as critical as other places because the is not much below on the lower deck. It will still be less than I'm used to.
3. Forget the bridge because I can probably install it farther down the line. The key is "probably". These usually turn out to not work so well when I finally get around to measuring things.
All in all a pretty good two days since the Op Session.
Thursday, January 27, 2011
Time to Work on the Helix
Today I decided to work on the helix. I had already made most of 1 loop just for checking heights. I figured the total would be 2 turns.
The method I used was to make 1/8 radius cutouts on 3/8" plywood. I then offset and glued them together for strength. This would give me the 3/4" thick sub-roadbed with no connector plates. So far this is does not appear to be as sturdy as my last helix which was made out of 1x4 lumber cut on angles and biscuit jointed together. So far I liked the old method, but we'll see how it goes.
I planned on using all-thread rod to make my separation. I forgot to make the sub-roadbed wide enough, so I installed a small bracket to connect the rods. This minimizes the amount of space/height required to get over the lower loop.
I glued on the cork roadbed on both loops an tomorrow I'll mount the first turn and lay the track. Then I'll work my way up until I'm on the second level.
Sunday, January 23, 2011
Saturday, January 22, 2011
The railroad expands into Searsport.
It has been a while since I posted some pictures, so here they are. In the last couple of days I added track into Searsport from Rockland and put up the backdrop between Searsport and Rockland.
Searsport looking north.
Searsport Looking South. The Yard lead goes to the left. The empty road bed leading off to the right will connect the helix to the upper level.
Rockland looking South with its new backdrop.
Thursday, January 20, 2011
Finishing Up Changes & The MER Convention
I was finishing up some of the Staging changes because once I cover it up there will be no going back. I also took this time to put in permanent bracing for Searsport (above staging). I made a few changes in staging to allow me to raise the track in staging once I get all my Tortoise machines installed above it.
I was thinking that I would be done for a little while and then I get an email asking if I would consider opening my layout for the convention. Of course I said yes, that is what this is all about. So what does that mean for me? I have until October to get as much done as I can. The ultimate would be to have all of the upper level completed so I can have the full planned Op Sessions.
All of the bench work is already up for the upper level and the upper level staging track is already in. Part of the helix roadbed is done. So this should be easy, right! It is until you consider all of the things that will sidetrack you from your goal. Well here we go.
Monday, January 17, 2011
I though I was done with changes for awhile
I had to take down the plywood for Searsport (which was only there to test some theories), to put in the backdrop framework. This uncovered the mid staging that had only 6 tracks. I decide to take the time to add one more track there, since once covered it would be impossible. I was able to do everything to get it ready to go except the programming changes and control panel changes. I don't plan on using it right away put now I can put the Searsport decking back on and lay the track work at Searsport. As I get more track down I will already have the extra track just in case.
As the almighty's say "you can never have enough staging.