Friday, December 31, 2010

Getting Closer to Ops

The engines have now been tuned for DCC. Time will tell how well I did. I expect some to change as they get some run time. The new engines seemed to take a high starting voltage to get rolling.

The cabooses have one resistor wheel per caboose, which is all I have. I did order all the stuff necessary to make my own wheels so that every car will have one resistor wheel on each truck. I would only have to make about 500 hundred of them.

I was able to get Rockland track work completed and all the turnouts are working. I do have to finish the local panel, but that has already been started.

The industries have been named and located. The CC & WB's are ready to print. I may do that today.

I still need to fix some of the staging tracks in St. Albans. It's about time to pick a date.

Sunday, December 26, 2010

Getting engines ready

I brought out the engines that I previously converted to digitrax and some of them weren't running so hot. I had trouble programing the engines until I reread the directions and realized I missed one step.
I got concerned about having enough engines so I ran the the Choo Choo Shop and bought a bunch of N & HO scale decoders so I would have a mixture for my engines. I also had some previously ordered Z scale decoders also came in.
I was slow in getting started, but I did end up doing four before I quit and I straighten out some issues with the previously completed ones. I will have to test run these on the layout to ensure they are ready for Ops. I do know that one steam engine does not like the layout because it stops at all the fogs I tested it on. It also has sound so that makes it more annoying. I have not powered the frogs yet, but it looks like I'll have to if I want to run steam. (Oh joy).
Today I'll continue on and see how many more I can get done. Who knows, I may even get even done to run with two engines per train.

Thursday, December 23, 2010

Panels and engines

I got the last two panels installed. A two day project that took five. I ran out of crimp connectors so I have two lights that don't work, but once I get the connectors that problem will be solved.
I started work on the engines to see if I had enough for an op session. I already tested some of the engines and I knew they were OK, but now I had to bring out ones that I changed decoders on. The steam engine with the sound did not like the frogs at all. Some of the diesels didn't want to take a program change so they will have to be looked at. Needless to say I am short on engines.
I did order some decoders and they were delivered today. I also ran down to the Choo Choo Shop and picked up a bunch more. I know what I'll be doing in the near future. I have a good selection of Z, N and HO decoders so I should have plenty to choose from. This should give me plenty for an Op Session and maybe even some double header consists.
While I was at the Choo Choo Shop I asked if they could program my two F3's for the engine number, because I wasn't able to do it for some reason. They were able to get the job done for me. That is one less set of engines on the default settings.

Sunday, December 19, 2010

Op Session on the horizon

I decided to call for an an Op Session with a small group, to further test the lower level. This will surely get you going to finish the details that need to be done. The car cards are ready to be printed, cars have been tuned and placed on the layout. I have leveled some of the sidings that needed it. I need to find resistor wheels for the cabooses. I will need to make sure I have enough engines ready to go.
I did start work on a control panel which will make the dispatchers life a little easier because he won't have to control a towns sidings near staging by himself, for the local switch job. The panels will also have the staging track local controls in them, which is only a convenience for me between sessions.
Aaaaahhhhh talk done, back to work!!

Friday, December 10, 2010

Track Testing and Benchwork update

It has been awhile since I updated. I had a few issues in my busy life that kept me away for awhile. I had been working some on the connection between the upper and lower level. From Rockland to Searsport the roadbed has been put in place and the benchwork for Searsport has also been put in. With a little height adjustment I was able to get it in with no helix required. At the other end of Searsport I started a two turn helix to get the rest of the way to the upper level. I'll be checking grade and placement on this before it gets put in permanently.
Today Ralph and Phil came over and we tested the track and controls to see how everything worked with a small crowd. We pulled and pushed cars all around the layout and tested every bit of track and controls. They were very few issues to report. Some were fixed on the spot and some will be looked at. I had one interesting one where a turnout track had bowed and caused a misalignment of the rails. I tried moving it over and holding it with track nails, but actually appears to have pulled the rails away from the ties. Now I'll have to see if I can use spikes on the rails to fix it, or is a new turnout in order.
All in all a very succesful test.

Friday, September 24, 2010

Dispatchers Panel

The dispatchers panel was completed yesterday. The dispatch will be able to see the whole railroad at one time. We did find one little glitch that we hope to have fixed soon. Some turnouts are made to show on two pages. Each Occupancy Block freezes on the screen temporarily on the three screens that relys on the server. We have a workaround for now, but the fix is being worked on.

Monday, September 20, 2010

Let the testing begin...

The last major construction hurdle has been completed for starting operations. All the panels are working. The dispatchers computer is working. I hope to have all monitors up and running this week. I'm running engines and a few cars around the layout while testing all sidings. I do have a few little things to work on, but that is part of the process after building for a year.
I found a wire that wasn't soldered good enough and one set of wires reversed, which only showed up when I tried to cross over two different blocks. It looks like I'll need to clean tracks and wheels and hopefully everything will run a little smoother.

Monday, September 13, 2010

Well most of the lights are working.....


However they aren't supposed to all be on.

During the building of the panel many things had changed and none of it was tested. When I turned everything on, nothing worked, including what was working.

I tried different things, checked wires, nothing helped. I decided to go back as far as I could and start with introducing one new thing at a time.

I first took out the new panels, but it didn't help. I took out upgraded I/O's and programs. No good. I had run a new networking scheme and noticed that one half, while it didn't work wasn't giving me errors like the other line. I disconnected the offending network bus, changed files and started up the half system. Now this side was working again. OK progress.

I went back to the other network and brought online one I/O at a time and things were starting to look up. I ran across one bad network cable (which was probably the biggest offender), I got eventually got everything I had before working and called it quits for the night.

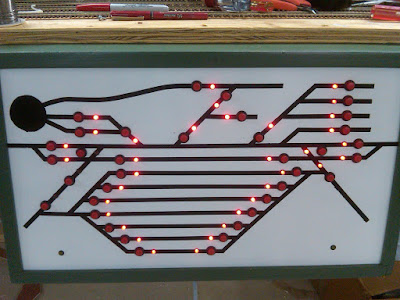
I came back down in the morning and put all the new files back in. So far so good. Now it was time to bring on the new panels. I started with the smallest I/O first. It was OK with just a small wire goof. Now the big one. I turned it on and got the lights you see above. There were data file errors, some plugs had two wires backwards, a couple of cold solder joints and "THE BIG ONE".

I just realized I'm missing a button and there is no way to put it in where it belongs. I'll have to make a new panel or come up with a work around. This panel took about a week, with all my great experience, I might be able to cut down the time in half. At least most of the soldering work is already done. The LED's would be the ones I would be required to remove for this change.

The other godd news is that everything that is installed is working correctly. Now to find a plce to put that button.

MODEL RAILROADING IS FUN..... model railroading is fun.....model railroading is fun

Saturday, September 11, 2010

The light bulb comes on

I spent the last three days wiring up a panel for my main yard. I have 37 buttons and 39 lights to connect to my computer I/O. When I finally get near the end it hits me, the computer I/O only has 32 connections for buttons and lights! DUH! And the light bulb comes on.
Now I have to find places to connect for the leftovers. It sure is great when a plan comes together. The good news is I can start testing this panel tomorrow.

Thursday, September 9, 2010

Portland Panel

The Portland panel started out smaller but had to be increased in size due to the addition of a few more tracks. I took a larger panel and modified it down to a comfortable size. It is still a little bigger than I would like but what are you going to do!

I was told that to a certain person I know, this next picture might be like a playboy centerfold, so I had to include it.

This is the inside of the Portland panel without the lights and wiring to make everything work. The upper right is the circuit breakers for Portland. One for the mainline and one for everything else. The big green panel on the left is the computer I/O and will be used so the computer can the see input from the buttons and send output to the lights. The other panels are where all the buttons and lights get connected. Then those boards will connect to the I/O.

I was able to get about 1/3 wired up and I couldn't stand it any more. I will take a break until tomorrow.

Tell me again, why I am doing this..........

The two wire DCC lies

If DCC truly only required two wires, what would I do with my spare time? Steve Holzheimer came over to help and we spent two hours running wires not related to the track wires. We ran new network cables based on the suggestion of Dil Huey. We then went on to mount and wire all the Digitrax UP-5's and wire them up.
Today I probably test it all.

Thursday, September 2, 2010

Update

The engines can still run from end to end. I put in two turnouts and the three tracks for the coach yard and REA building in Portland and ended up with a problem in the circuit board. The problem it turned out was a stray wire on one of the tortoise from pin 7 to 8. Once that was fixed and the circuit board changed out I was back in business.
I added three tracks in Portland yard and 4 turnouts. The tortoises are installed, but the computer program I am using has some limitations on the number of turnouts per screen page, so these turnouts are not functional in the computer yet. There are some ideas floating around on how to get around this.
I decided to do some of the odds and ends while debating how to handle my screen problems. I finally moved a workbench to the location where the dispatcher will be, so I can get all the screen set up. I added a light over this area, so the dispatcher can see. There were a bunch of sidings that did not have any track, so today seemed like a good time to install them. Three sidings had their track installed and 1 turnout that still needed to be installed. Three other sidings were prepped by installing the roadbed leading to the siding.
I have been working with the car cards to get them ready for when I want to actually host a mini Op Session.
I guess that is about it for now.

Tuesday, August 24, 2010

Mainline is open

I ran an engine all the way through the mainline. I ran into a few glitches as I went around. Made a few adjustments as I went around and I think we are good to go.
One of the problems was another old style switch. I did gap the frogs, but apparently didn't cut all the way through in one spot, so I cut it deeper and now it is OK.
I still had two turnout motors to install on some new sidings and went about doing that and somehow I may have messed up because I'm getting and error message on one of the circuit boards. Oh well, I'll check it out after I return from the mountains.

Thursday, August 19, 2010

Shorts are fixed

It turned out that the shorts were caused by turnouts that weren't as friendly as I thought they were. There were three of my older Peco Electrofrog turnouts that were isolated on the output, but not on the input of the frog. This solved one area in St. Albans, but there was also the dreaded three way turnout in Boston. I took out this turnout and the shorts were all gone. I took the turnout to the bench though about where the cuts needed to be and started modifying. I put the turnout back in and the short is still gone. I just have to determine if I have power on all sections of the rails.
I cleaned track in Boston and Cumberland and attempted to run an engine and it wouldn't go. "Oh great, now what did I do?" ran through my head. Turns out it was the engine. I ran another and it was fine.
While I was running, I found places that needed more drops and a turnout wire that broke. You know, all those little things you find when testing begins.
And the testing continues.....

Wednesday, August 18, 2010

I saw engines moving today

Today was a good day. It started out by cutting the gaps that I missed during installation of everything else.
I disconnected all power to all of the power districts but one. I then went to the end of the layout and started cleaning everything off of the track and vacuuming to ensure that anything that could be shorting the track was found. I turned on the power and discovered a short. After a little troubleshooting I found out that it was in the block where the staging ladder to the main line was. I did a quick check and couldn't find anything obvious and I could clear it up by pulling the occupancy detector and leave it off. I decided to go check all of power districts and then see what fixes were needed.
I had the same problem at the staging ladder at the other end of the layout. I guess whatever I did at the ladder I did twice. There are 60 separate blocks on the layout and only two were bad. I'm thinking that was a pretty successful day. Tomorrow I'll try to figure out what the problem in those two sections are..

Monday, August 16, 2010

Time to start track testing

I finally got all of the track power hooked up. Testing will start soon to see if I did it right.
I had been debating on a change to the engine facility. I finally just changed it. I moved the turntable turnout down about two feet to better serve the turntable and engine facility. This required a few other things to be moved, so while I was soldering anyway, I made the decision to make the change.
I found issues with some of the gaps that I will have to finish, but that will have to wait for Wednesday. Tomorrow is another day to play trains.

Almost there....

I am getting very close to to having the wiring completed for the track on the lower level. I foolishly thought that I could finish in one day, but after about seven hours I had enough of crawling under the benchwork. Only a little more to go.
Of course, while I was doing the wiring, I found some things that I missed. I have a couple of older style turnouts that didn't have the frog isolated, so that will have to be fixed before the power gets turned on.
I still have the area around the turntable in Portland that I need to think about changing. The engine service area doesn't feel right to me the way it is. I think I'll draw up some changes and see what people think.

Tuesday, August 10, 2010

Occupancy Detection and other things

Today I finished installing and testing the Occupancy Detectors and they all work. I still have to wire some of them to the track, but the computer sees them all.
The programming issues I had earlier are mostly better. The dispatcher's computer works and a lot of components have been re-numbered. There is still some re-numbering to go, but it is in the area of the layout that hasn't been completed.
Some of the industry track in Portland has been re-installed and it looks like a design change is in order near the turntable. I still have some gaps to cut, but I must look at a track change before I do that. This is also keeping from from doing the Portland control panel.
The fun never ends.....

Sunday, August 8, 2010

If it ain't broke....

then why am I messing with it.
I have a perfectly running computer and control system at this time. Well I did.
Every turnout, detection block, indicating lights and buttons get their own number or letter depending on what you are talking about. For the purpose of trouble shooting later it would be nice if things were in a logical order. During the process of designing a system you start out this way and things are added or taken away and this nice order you had becomes somewhat haphazard.
So I decided it would be a good idea to reorder everything to make it sensible again. I got my drawings out and re-numbered or re-lettered what needed to be done. Then I went to the computer with a plan to change everything, so it would come out right the first time. Yeah, when have I ever had that kind of luck. Needless to say, my whole train world turned upside down and nothing worked when turned the computer back on.
I have been at it for two days and I have some of it, but not all working again. I still can't imagine why some turnouts are working backwards from before I had this brilliant idea. I even found a turnout without a tortoise machine. I still can't figure that one out. How could a machine disappear just due to programming.
The good news is, I have a back up of the way it was before I had my brilliant idea. Now it's a matter of pride.

BTW: I did change Tortoise machines around earlier, I just forgot that I hadn't replaced that one.

Wednesday, August 4, 2010

Connecting up the power

There aren't any pictures when you spend most of the time under the benchwork. I connected all the drops and put in occupancy detection for all of the lower level staging yards. I then proceeded to run the power district for the next section of track. With the exception of cutting the tortoise throw bars down to size, both staging yards should be ready for actual running/testing of trains.

I also finished the third control panel All three are running correctly.

Control Panels


I received control panels from two other layouts that were no longer using them. Both styles were basically them same, with the exception of door thickness and how the replaceable panel went into the box.
One of the panel styles had four screws hold the panel in from the front and the other slid into slots like the way a raised panel door is made. All I had to do was redesign the panel face and hook all of the new electronics in.
As with a lot of projects the first panel was the toughest. I designed the look on a CAD program, but when I actually cut the wholes I found out the were too close together for to suit my tastes. I made the second, first panel and cut a couple of holes too many. Finally on the third one I got all of the holes correct.


Then it came to painting and taping, which was OK, but it also didn't suit me when the tape kept twisting when I was screwing the buttons in. I changed my way and put the tape on, but then painted over it with a different color and then removed the tape. This worked better for me. I also found out that you needed some kind of lacquer over all of this to protect the paint for being scratched off. Of course, I discovered the lacquer thing after allowing my fingernails to scratch off the paint.


The top panel is of Belfast and its wye and the hidden staging at St. Albans.

The middle panel is of Cumberland Mills.

The bottom panel is Bath.

Dispatcher's Display's

The four dispatcher's display that will be used on the railroad. One on each of the four monitors.

The screens will line up to show the whole railroad in a linear diagram. The bottom of the screens represent the lower level while the top represent the upper level.

The top picture shows lower level staging.


The second screen shows Cumberland Mills and Portland on the bottom and Searsport and Acadia on the top. The green line shows the transition from one level to the next.

This screen shows Bath, Belfast, with its connection to the St. Albans and Northern, and Rockland.
The top part of the screen will be Bucksport and Katadhin.


The final screen shows the upper level staging, Lower left shows the staging at St. Albans.

Friday, July 30, 2010

First working control panel

It took me all day to wire this up and program the computer, but I now have my first working control panel. It does work both locally and at the computer. I still need to label it, but I'm thrilled to have gotten the electronics working.

This panel will control the town of Belfast, the wye and the hidden staging at St. Albans.

Sunday, July 25, 2010

Control Panels

A while back I was given control panels for my use. The front of the panels have a faceplate that is changeable. Today I spent the day making some of those face plates.
I had designed some of the face plates earlier and the first one I tried showed real quick that the track spacing was not big enough for the push buttons. The lights were also a little close for my liking. I did a little testing with some old panels and came up with new spacing requirements needed for the panels to look good. I went back to the computer to redraw the panels and then went down to start making them.
The first thing was to make the four new face plates without the holes cut and test mount them. Once that was complete I took one panel and started to cut the holes. I promptly screwed up that up by cutting too many holes. Back to cut another one. I finally got my routine down and made three with all the correct holes. I painted them and waiting for them to dry. Tomorrow I'll need to get the proper size tape before I put on the finish coats.

Thursday, July 8, 2010

Control Panels

I haven't shown a picture in awhile, so here's some on my recessed control panels. Also, note the slightly extended yard in Portland.
Sent from my Verizon Wireless BlackBerry

Sunday, July 4, 2010

Tough Progress

It took awhile but all the turnouts on the lower level are powered and operable from the computer/dispatchers panel. It took a lot of effort to get the last TSM's installed because I had to modify some of the supports under the benchwork.
I had some problems with the circuit boards (I think). Sometimes I'm not sure what is happening. I eventually got it all working today.
Once I get the blocks cut and powered up I will be able to run from Boston to St. Albans (lower staging to mid staging). That is essentially half of the railroad.

Friday, July 2, 2010

Dispatcher Panel and Computer Control

I have been designing the screen placements for the dispatcher with the help of Dil Huey. The screens are starting to look real good.
I have also got all of the installed turnouts powered up and controllable from the computer. I had some help from Steve Holzheimer. They all work good, but the double slip switches have an issue with getting the correct route display under certain conditions. I'm told this is a fixable condition, which I'll get to after my vacation.
I have half of the occupancy detectors working and I hope to get to the rest of them in the next week.
When all that is done it will be time start powering up the track

Sunday, June 27, 2010

Turnouts & Control Panels

I now have about 1/2 of the lower level turnouts and occupancy detectors installed. I also was able to install two of the control boxes. They are recessed to minimize how far they stick into the aisle.
I got the control boxes from Steve Benezra and Don Bullock's layouts because they were no longer being used. I will have to change out the front of the panel to match my needs, but they were designed for that. All of the panels open to the front for getting at the components. One batch of panels has a deeper front panel so I'll use those where I have more space and use the narrow ones in the tighter aisles.
I got all of my tortoise machines from these two layout and they all had wires attached to them. When I first put in all the tortoise machines in staging I used the ones with the longer cables thinking I needed to reach farther than I actually did. When I started hooking them up the wires were way to long. I eventually discovered that I would have to rewire what was left or swap out the tortoise machines. I spent the day swapping out the TSM's to better match wire length's. I'm not done, but it looks a lot better than it did.

Wednesday, June 23, 2010

Computerized Turnout Progress

I was able to get the first turnouts working with the computer. The more I understand how the program works, the programming will go a little smoother.
The turnouts in lower level staging and the first town are all working correctly. There is only three turnouts from staging to the first yard that are not available. Two are not installed and the other one needs a longer wire hooked up to it.
I even installed a box for remotely controlling turnouts at the town where I have the turnouts working. The boxes came from another layout, so the front of the panel will have to be changed out to match the track for this town.
Progress is happening again. You got to love that.

Tuesday, June 22, 2010

Success

The layout has been some what ignored due to some trips that I just had to take. I have been back at work programming the computer so that a dispatcher can control the layout. I have been learning bit by bit (literally) the programming required.
I connected a couple of turnouts to the computer, but I was not getting the response I hoped. I tried many things to no avail. When I used a test program on the computer I could get each turnout to move, but when I brought up the dispatchers panel, no luck. I tried many combinations of buttons. Lo and behold it turned out that I needed to press the "Enter" key. Who would of thought and I'm surprised I didn't think of it. Duh!!
Now I have to get the turnouts to throw in the proper direction for each state. At least I'm now heading in the right direction.

Monday, May 10, 2010

Today's Lesson

Today Dil Huey, the CCOG electronics guru, came over to drop off sheets of styrofoam for my eventual use in scenery. He also came over with a surprise....he planned to show me how some of the electronics that I have been installing works.
We hooked up some temporary wires to power up some of the circuit boards and tested turnouts and detection. It was amazing to see the things I installed working via computer. I got a good lesson in programming, drawing track plans on the screen and testing the components.
Thanks to Dil.

Thursday, May 6, 2010

Workin on the railroad

I was able to get back to work and put in 11 more tortoise machines. I now have 47 in. There are a couple of places where I'll have either put in a contorted switch arm or move the turnouts to a new location.
Rigby Yard now has turnout motors on all the installed switches on the north end, except for two that are in troublesome locations.
While I was at it I took out a straight #6 switch and replaced it with a &.7 curved switch. This move was to bring out the mainline closer to the front. It was it little to close to the backdrop. It would have worked, but I wanted to put in a bridge near there and the bridge wouldn't fit the way it was.

Monday, May 3, 2010

Tortoise Machine update

I have been slack in working on the layout. Traveling this summer will keep me away quite a bit, so this may push back the operating timeline. The good news is I installed 20 tortoise machines today. That brings me up to 36 installed and roughly 79 to go.
All the turnouts in lower staging, mid staging and the town of Belfast, which has the wye leading to mid staging are complete. The town of Bath is mostly done and the town of Cumberland is half done.
There are about 27 to go on the lower level, most of which is in Portland. I am contemplating a change in the South end of Cumberland before I put the tortoise machines in. I'll worry about that when I get Portland done.

Thursday, April 8, 2010

Tortoise Machines

I finally crawled under the layout and I was able to put tortoise machines to 16 of the 18 turnouts in lower staging. I will probably have to modify a cross brace to get one of the machines installed. I tried offsetting the .049 throw bar, but it didn't seem to be heavy enough to throw the switch points. I'll try again today.

Thursday, April 1, 2010

Wiring and trackwork

It has been a while since the last post, but things are still moving along. I finished the hidden staging track at the middle of the layout. I finished the wye and track work at Belfast where the hidden staging connects to the mainline.

I am going to use C/MRI for detection and I have been picking up parts from layouts that are being torn down or changed. I put in all the Occupancy Detector Motherboards (ODMB) that I have. I also added all of the Occupancy Detector Boards (ODB) that I currently have, onto those motherboards. It's amazing that 40 detectors only gets me half way around the lower level. I'm wondering if I'm crazy for getting this deep into it.

I ran the power bus around the lower level. I'm trying to figure out where to place things like Auto-reversers, and DCC circuit breakers.

I have also been trying to figure out JMRI to draw my track plan for a CTC panel. Needless to say, it's keeping me busy

Friday, March 19, 2010

Upper level return loop

I put the upper level return loop benchwork in place today. It matches the benchwork from the lower level.
I wasn't sure if I could get the supports needed to hold up the upper level and still be able to scenic the pond on the lower level. It looks like that will not be a problem. The next step will be t build the curved roadbed for the track.

Wednesday, March 17, 2010

Finally, I get to use a piece of the old layout

I talked to a few people about the helix dilemma and I decided to not use one. The possibility of me actually using it was low so not worth the trouble. In the mean time I had a thought to put in an industry where the helix was going to be. The sawmill seemed like the perfect solution. I would have had a hard time putting the pond in somewhere else. The siding I put in for the return loop of staging would be a could place to place a switch for this industry. It is a little shorter than before and all the buildings won't fit here, however at the other end of the siding there a place where the wall changes direction and I could put the rest of the industry there. Then you will have a train called the "Wood Job" that could take flat cars of rough cut lumber from one part of the complex to the other side to be planed. A distance of about 10 feet. This also allows the train to traverse the whole railroad to the paper mill, instead of just a couple of towns.

Monday, March 15, 2010

Helix between staging levels

I made the return loop for the lower level staging at a 28" radius. The intention was to place my old helix, which was a 24" radius inside of this, just to allow continuous running between decks. As luck would have it, it didn't quite fit.
I accidentally moved the center line of the outer loop to far in, so I couldn't quite match the helix up with this. I should have made the outer loop at least 29". The way the helix was made it would have helped. I would have to also add another loop to get the height needed for the second level.
Now I have to decide if the helix is actually worth the effort to get it installed. I had the option for continuous running on the old layout and never really used it.
I have a couple of options to decide on
1. Forget the helix.
2. Rebuild the helix at a slightly smaller radius.
3. Forget the helix, but add an industry inside of the return loop on the lower level. The upper level is probably too high to do the same thing.
Time to put on the thinking cap again.

Monday, March 8, 2010

Revised Layout Plans

Below are the revised plans for the railroad. The first picture shows the lower level and the new hidden staging that will be half way through the run and represent the Mountain Division of the old layout.If you were to take a North bound train, you would start from Boston staging in the lower left corner and travel up through Cumberland Mills and then on to Portland. You would then travel to Bath and then to Belfast where you could go to the Mountain Division or onto Rockland depending on the train you have.


When you leave Rockland you would head toward Searsport while climbing toward the second level.


When you leave Searsport you have a short climb up to the second level where you cross the Penobscot river heading to Bucksport. Continuing on you go through The Notch, Katadhin, Woodsville and then into Northern Maine Junction in Bangor.
If you are wondering there is still more designing to do for the upper level.

Thursday, March 4, 2010

Staging and more

I have corrected the track spacing in staging. Installed the upper staging tracks. Today I hope to add the upper level staging turnouts to get 10 tracks down to 1. Maybe even add the branch line staging. I may not make it, but making goals and having deadlines usually gets me farther along.

Wednesday, March 3, 2010

Upper level staging.

There was a couple of days where it seamed little progress made on the layout. Of course the things I did still needed to be done. It was just part of the room modifications I was putting off. Now both the upper and lower staging sections are done and the track spacing has been corrected for signals. I thought I was going to get to the new staging area at the midpoint of the layout, but things come up and get in the way.

I have the turnouts needed to put together the reverse loops in both the upper and lower staging. So now I have more benchwork to build. The return loops radius will be 28" and I am still deciding on whether or not to put in a 24" helix inside of these loops for connecting upper and lower staging. This helix would be just for mindless train running. It would not be used for operating sessions. I guess I'll decide if the helix will be worth the effort or not.

Saturday, February 27, 2010

Good Progress

I had been putting off a few things like moving the sprinkler system control box, adding more overhead lights and power for the lights for the lower level and power for accessories. I finally just had to get the job done.
Moving the sprinkler box was not a big deal. The biggest decision was trying to figure out where to put switches to control the power under the layout. The easiest was to put a light switch nearest to the receptacles. This would have meant squeezing into a place behind the layout to turn off power. The hardest and most expensive was to put a switch near the entrance to the room. I agonized about this for awhile and I decided that the switch by the door would make the most sense after all the work was over.
I also added the power for what I believe are the last of the overhead lights. The light level looks pretty good now. I'm sure I'll have to adjust slightly as the rest of the benchwork is completed.
All in all good progress was made today.

Friday, February 26, 2010

Couldn't put it off any longer

I finally had to move the sprinkler system controls. They were in the way of upper level staging and I left it there to do later. Later arrived. I couldn't put up the staging yard until I moved it. The controls are now out of the way and I only have 1 receptacle to put in and I can put in the staging yard.
I bought some rope lights and tested them under the benchwork and light is the wrong color and not bright enough. I also tried a LED light bar and I liked the looks. They are pretty expensive though. I have one other idea that I was shown to try. We see what happens.

Sunday, February 21, 2010

Staging to represent the old Upper Level

I can make the staging work according to AutoCad. What I didn't count on was the tortoise machines under the yard at Searsport, which will be above the staging. We could have a problem with the clearance under the yard. Since I don't have Searsport completely figured out, I'm not if I'll be able to work it out.
I originally decided to use a staging yard with a return loop to minimize the handling of trains. Since I have a wye on the mainline I decided that it could be a stub ended staging. I could back the trains out onto the wye between sessions and turn them, just like I did on the old layout.

Saturday, February 20, 2010

Odds and Ends

I have finished re-spacing the track to allow for signals in all of the towns. Most of the sidings have been done.
I took the time while glue was drying to try a figure out if the staging that would represent my old upper level would work. I spent some time in AutoCad attempting to arrange a four track staging yard with a return loop. I am also trying to fit a small passing siding and a wye to the main line for this staging. The turns to get to staging might have to be a little tighter than I would like, but I had that same problem on the last layout.
I am also trying to decide if I want to widen the yard at Portland. Some of this comes from having to re-space everything and wondering if an extra track would be good.

Decisions... Decisions.

Monday, February 15, 2010

It's Disappointing when....

you realize that something you have always done, doesn't work with the new direction you're heading.
I have always kept my track spacing towards the minimum. It looked better to me. I never had a problem with this arrangement, until now. I am going add signaling down the road and I was doing all the prep work needed as I was laying track, or so I thought. During phase 1 I built two towns and a yard with 2" spacing, which worked fine, until I decided that I would rather have code 83 and use all my code 100 for staging. While I was changing out this track and turnouts a brick hit me in the head (figuratively speaking) and I realized I hadn't allowed the track separation for signals. There was a short scramble to find out what my options were and now I'm in the process of changing the track spacing in the yard. The other town might have to be different because the track is glued down.
I also made two staging yards at 2" spacing. I will be changing the spacing on the return tracks so I can get signals installed on those. The other eight tracks won't get signals. The last town I was working on in Phase two had a wider spacing just due to dumb luck. It should be OK.
From here on out the track spacing will be correct. Time will tell what other surprise will come up and bite me.

Friday, February 12, 2010

Cumberland Mills

Just thought I would post a picture of the north end of Cumberland Mills. This is the first town out of lower level staging. Portland would be around the corner to the left.
Sent from my Verizon Wireless BlackBerry

Sunday, February 7, 2010

I never have everything I need...

so I just have to plug away the best I can. I made an order for turnouts and I was even thinking ahead. I ordered replacement turnouts for the made yard swapover to code 83. I also had to get a code 100 turnouts to do the upper level staging. The order is being held until next week when the code 100 turnout comes in. Unfortunately that is the turnout I need the least. The rest I could have used yesterday. So, I put down a lot of code 83 from lower level staging around most of the lower level leaving spaces where the turnouts are needed. I could lay all the track and then cutout for the turnouts, but I just don't want to waste all that track.
One of my other problem areas is the towns. I can place industries easy enough, but trying to think of the whole scene is where I have my problems. So I stand in front of my town and play chess with buildings trying to come up with a good combination of city scenes and industries. I look through my building kits and see if any of them will fit.
I purchased enough sheet cork for upper staging, but now I'm short on Atlas re-railer tracks. I go to the local stores thinking that is pretty basic part and nobody had any. Maybe I can get that added to my order before they ship it out.
There is a cinder block post in the room that the benchwork is built into. It turns out that a Walthers low relief buildings will fit right in front of it. The only thing is the track may not be able to go there, but I'm sure I can make some kind of scene to hide the post.
I'll post pictures later when I have some completed scenes.

Sunday, January 31, 2010

Lower Staging is installed

Well I finally got back to the trains. I put a 10 track staging yard in the lower level. There will be at least 8 or 9 tracks for staging and 1 or 2 for the return loop. Right now I'm leaning toward having a passing track for the return track. With any luck I put the blocks in the right place for detection and signaling. There we only be 1 signal to get into staging and whatever is needed for the return track. I had to carefully plan this because the upper level staging will be exactly the same. Above you see the tracks just ending and loose. That is because the eight tracks to the left will go the the left and then circle around and connect up with the two tracks to the right. That way I won't have to handle the trains.


The only thing I didn't do was cut the holes for the tortoise machines. I did at least think ahead and I believe all the machines will fit under the turnouts. Once that is done I can start laying track up to Rigby Yard and all the way around to the spot across the aisle from where this picture is taken.

Sunday, January 24, 2010

Catching up

I've been away for awhile and there hasn't been much done. I had a goal set to be operating by Labor Day and I had to know by next week whether I was going to make it. I decided that I was probably not going to make it. The pressure comes off, but then so does the speed at which I was working. I did take some of this time to refine some of the track that wasn't set in stone.
I also had to do some major clean up to do, because I couldn't move around the room very easily. Today I decided to spend some time laying down the cork roadbed for a lot of the lower level. I decided to try using caulk this time. One reason is that it is supposed to be easier to pull up than glue. The other is that it is tacky enough to hold the cork in place. It does hold the cork pretty good, but I still needed the pins as the curve got tighter.
Tomorrow I'll go down and see how good it holds. I do have the main line cork down on most of the first level.